- Look at the semester in Review. including websites (pwd: fot)
- Journal: Answer these final reflection questions:
- What were the most valuable things to learn about in this class?
- Which unit was the least valuable?
- What would you change about this class to make it better for next year? (you must specify at least one thing)
- Work: Empty your binder and recycle or take it home.
- Summarize class
- Summative grade: the semester in Review. Due today.
Look at websites (pwd: fot) and egg drop videos on Handout drive for reminders. [ Be sure to use details and be descriptive to geet the full points ]
- Summarize lessons learned in second semester
- Look at origami in science. and applications
- How can origami fold itself?
- Build an origami box. Use precision.
- List applications of folding in biomed.
- Create an interlocking folded design.
- Look at how proteins fold. (2:20)
- Learn about scorpion venom and the antivenom to save somebody who's been stung. (presentation)
- Build a folded protein model.
- Play the venom game on the Handout drive. Get at least to level 2.
- Create a model of folded protein amino acids.
- Describe how antivenom is used against venom by understanding the shapes of proteins.
- Biotechnology connects to computer science and engineering. Watch the video on how origami inspires biotechnology and answer the questions.
- Describe design inspirations in biotechnology
- Designs are inspired by many factors. Look at the 7 pictures in this lesson on chair design and answer the questions.
- Create an origami folded chair. Are these directions easier to follow than yesterday's video?
- Compare function and design of artistic chairs
- Follow directions to produce a design
- Look at architecture inspired by origami: Top 10 and this collection. There's even a college class on origami architecture.
- Learn about Muira-Ori folds and how they are used in engineering. Look at the different ways they can fold.
- Create your own reverse folded paper based on the Muira-Ori fold.
- Find at least 3 other examples of how origami has inspired engineering that were not covered here.
- Describe applications of origami in architecture
- Create a reverse fold based on the Muira-Ori fold.
- Show off designs from the Digital Designer.
- 3d design happens many different ways. Watch the video on origami and answer the questions.
- Demonstrate designs created in the digital designer.
- Describe how origami inspires real world design
- Last day to experiment with Lego Digital Designer. Design a vehicle. Here are suggestions and the rubric. You can create a design of your own that meets the rubric.
- Put a screenshot of your vehicle on the 3D vehicle page in the Collaborative section of OneNote with your name next to it.
- Arrange and rotate parts in 3D
- Sketch an 8-bit character on graph paper and then create it using the Lego Digital Designer. Get a screenshot and paste it into the 8-bit character Collaborative Page in OneNote.
- Design in old style graphic mode.
- We created 3D designs before in SketchUp, now experiment with a different 3D design tool, Lego Digital Designer. First design a 3D logo for an air powered car company and then design a 3d building or vehicle one layer at a time.
- Build in layers to create 3D
There are no new warmup papers. Use your own paper for today's assignment and write the warmup question and answer on top.
- Read the articles about new innovations with air power and answer the questions.
- Do the word search on the front teacher's desk about momentum and hand it in today with your answers
- Describe new applications of compressed air
- Define terms on air compression
- What are challenges of compressed air?
- Improve designs so that air powered devices can cross the entire length of the track and go uphill. Test to see which design is the most powerful.
- Test and refine air powered device designs
- How can air power a vehicle? (video)
- Design and test an air powered device with maximum momentum.
- Describe how air can be used to provide clean power.
- Design and build an air powered device.
- Air can cause damage in more ways than high winds. Learn about the effects of shockwaves that follow explosions. What's the difference between a shockwave in air or water?
- Use data from simulated tests to answer questions.
- Design ideas for an air powered device with maximum momentum.
- Describe how the forces in shockwaves can be observed.
- Design an air powered device.
- View the top rated and new videos.
- Which does more damage: a car hitting a wall at 100 mph, or 2 cars colliding at 50 mph? In this experiment the mythbusters find out and Newton's Laws are proven to be correct (05:47).
- Why were mythbusters wrong?
- Analyze data from simulated tests.
- Run the pendulum lab in the Handout/FOT folder.
- Describe what happens by running different setups.
- What values will cause the ball on the left to be bounced until its center exactly reaches the edge?
- Analyze data and results
- Describe how mass and momentum are related.
- Compare collision forces to Newton's Laws
- Vote for best video.
- Look at how NASA engineers test designs before going into space.
- Run simulated tests , record results, design experiments and make predictions.
- Review videos
- Describe testing processes the prepare for outer space
- Use a simulator to show forces of impact.
- Look at the University Rover Challenge. Human exploration challenge
- Finish videos. Add a picture or drawing of your device to your video.
- Share videos
- Document the success, challenges, and points of impact in video form.
- Comment on videos.
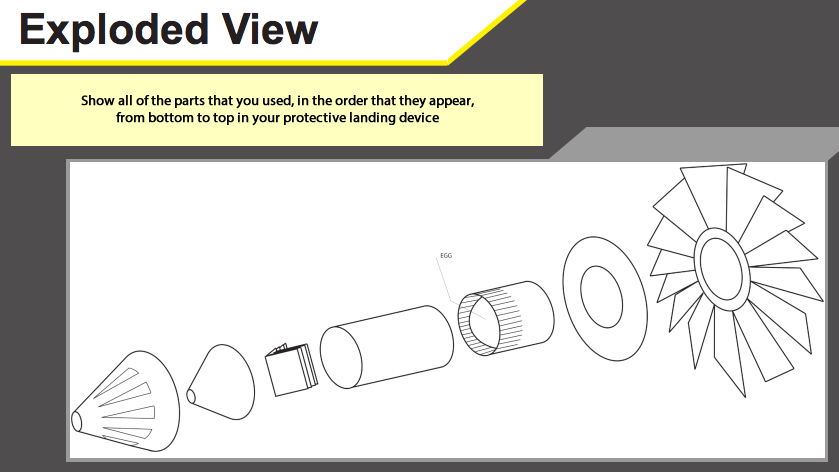
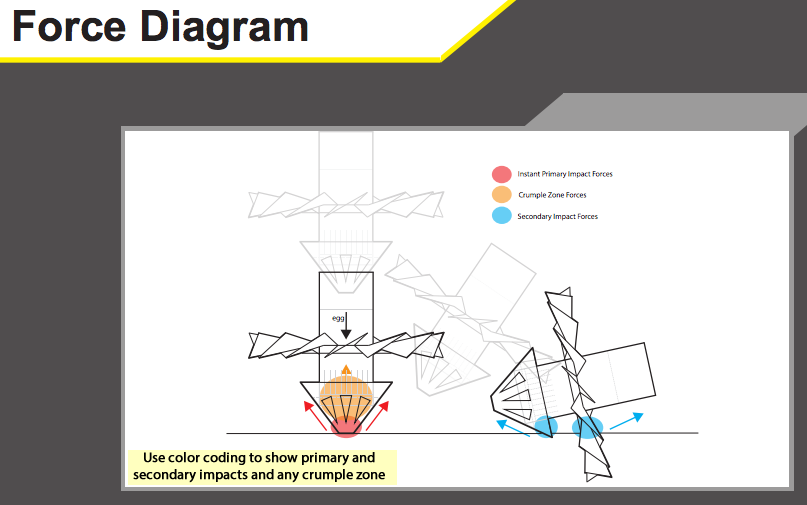
- Draw an exploded view and force diagram of your landing device on the back of your criteria/constraint sheet. HAND SHEETS IN TODAY.
- Make a video that explains one of your test runs. Your video should have:
- A title and credits
- A marker or caption to highlight the point of impact
- Record a voice over to explain why the test did or did not work..
- Optional music track, animations or video effects for extra points.
- Diagram all parts of a device in an exploded view
- Highlight areas of primary and secondary impact
- Document the success, challenges, and points of impact in video form.
- Add titles and credits to videos. Use MovieMaker (under Programs on the computer) or animoto
- Draw an exploded view and force diagram of your landing device on the back of your criteria/constraint sheet.
- Add title and credits to egg drop video
- Draw an exploded view and force diagram
- Finish building protective landing device.
- Test and video. Save devices.
- Incorporate successful ideas into your own design.
- Test designs.
- Investigate other successful designs for a protective landing device. Outline how primary and secondary impact were addressed. pb, 5 ways explained
- Summarize at least 3 successful solutions. Here is 1 successful project with research to start with.
- Describe how you can incorporate a good idea. Document changes.
- Research successful designs to mitigate primary and secondary impact.
- Incorporate successful ideas into your own design.
- Fill in notes on the landing challenge: purpose, criteria, constraints, etc.
- Finish building original prototype and test dummy.
- Run tests and make improvments. Document changes.
- Document project criteria and constraints
- Build and test initial designs
- Modify and improve.
- Hand in your materials lists.
- Run tests of everyone's large (newpaper sized) air resistance devices and original spinner devices to determine which characteristics are the most successful. If you can't find yours, rebuild it.
- Gather materials and build intial protective landing devices. Test in the classroom and make modifications to reduce impact and momentum.
- Perform test runs of similar devices, compare designs and results to generalize successful strategies.
- Build and improve initial designs
- Finish experiments to prepare for the landing challenge.
- Create a large and small rotocopter. Experiment with increasing angular momentum in small ways. Fill out the paper
- Choose materials for your protective landing device.
- Describe solutions to increase air resistance, cut down on momentum and add to angular momentum.
- Select a design and materials.
- In EXCEL
- 1. Create a graph of momentum results in a spreadsheet.
- 2. Complete the spreadhsheet for your air resistance
- experiments.
- ON YOUR PAPER:
- Do experiments to prepare for the landing challenge. and write up results.
- On the back:
- 4. Write down how your results compare to others.
- 5. Design and try an experiment using larger and
- smaller marbles. Write it up on the back.
- Systematically experiment with momentum, angular momentum and air resistance.
- Graph, compare and describe results.
- Review transportation in space
- Fill in notes on forces used in the landing challenge.
- Review landing challenge experiment: physics concepts, criteria, constraints and plans
- Do experiments to prepare for the landing challenge.
- Describe effects of momentum, pressure and spin on gravitational pull
Thursday warmup: How does a graph make results easier to understand like the projectile graph you did yesterday?
Friday warmup: What was the most interesting kind of transportation you learned about on Thursday?
Thursday: Explore transportation in space and other challenging environments. Get a paper handout and fill in your answers. Due today.
Friday: It is a challenge to land spacecraft and machines in hard to reach places. Read about this experiment to land something carefully and design a plan for a solution. On your own paper, describe at least 3 physics concepts involved in this challenge, the criteria and constraints, hand in a sketch of your design, and a materials list.
- Describe transportation in unusual environments
- Design a safe system to land something carefully.
- Quiz: aerodyamics and plane control
- Use the projectile toss with air resistance turned on to make 5 different objects hit the target. Record results in the ProjectileData spreadsheet and graph the results. Analyze your graph. What does it tell you? Write it on the graph and data sheet and turn it in.
- Demonstrate understanding of aerodynamics and airplane control
- Experiment with speed and angle settings with air resistance.
- Add to notes about yaw, pitch and roll. Which parts of the plane control each motion?
- Try the quiz and see if you can label the parts
- Review for tomorrow's quiz.
- Look at AOPA resources for interested student pilots.
- Fly in Google earth and pay attention to the controls. Stall the plane. What speed/pitch will produce a stall?
- Describe which airplane controls change yaw, pitch and roll
- Experiment with controls in a virtual simulator.
- Review and label parts of a plane and what they do on the notes.
- Describe ways to modify a design to improve flight.
- Systematically make changes and record results.
- Alternate plane design if you are not satisfied with either of yours.
- Systematically make changes and record results.
- Presentation: About wind tunnels and virtual wind testing.
- Parts of a plane
- Activity. paper gliders. How far do you think a paper airplane can fly? Create 1 of the 4 paper airplane designs in the Plane Patterns Handout and its associated Plane Design Instructions; Test each one 3 times and consider why one design might be better than another.
- Create 2 different glider designs
- Modify a designed glider to improve its flight.
Jay, hello from the FOT class at La Plata!
- Experiment with the ways that air resistance changes motion. Compare a piano, pumpkin and golf ball with and without air resistance. Which one is most effected by air resistance?
- Build and test your best design to resist the wind with a low wind velocity and then a high wind velocity. Record results, make improvements and retest. Fill in a journal about your design project.
- Experiment with changes in motion due to air resistance.
- Build and test a design to withstand wind.
- Presentation: lift and wind tunnel testing
- Design a way to cut down on air resistence and test in a wind tunnel.
- Describe why wings lift planes
- Test a design in a wind tunnel
- Presentation: air and transportation
- Design a high flying plane and find the best angle for an efficient wing.
- Experiment with Bernoulli's principle
- Design aircraft components for maximum efficiency and lift.
- Look at some line following robots from around the world:
- Battle of speed (start at 1:30)
- Ottawa Canada mixed lines
- Manchester England contest
- Set up the color codes to win the bowling games.
- Compare different line following robot designs.
- Watch the Ozobot follow lines.
- Review the Ozobot color codes.
- Outline the algorithm together that controls the Ozobot line following
- When offered a choice of turns, Ozobot chooses randomly. Try the Ozo-Race. What codes are used?
- Experiment with codes and lines
- Control the ozobot using color codes and line following
What is a drone swarm?
- Discuss:
- What are features of robotic parking lots and drones
- What kinds of sensors do robots have? What kinds do drones or parking garages have.
- Create this program, to design a path from the pirate ship to the treasure using colors to signal turns.
- Control a robot using light sensors.
-
What is a drone swarm? Look at the pictures and watch the video Find more information and describe at the bottom of the page in the OneNote Robots section:
- What drone swarms can be used for
- Why drone swarms are so hard to film
- How drone swarms communicate
- Then find your own video on drone swarms or other swarm robots and report on it
- Describe features of swarm behavior
Why or why not?
- Look at these 3 robotic car parking systems.
- Describe each one in OneNote in the Robots section, compare the advantages and disadvantages, tell which one you think is the best, and why.
- Design your own parking system that is even better, on paper with a sketch and description, and hand it in.
- Compare robotic parking systems
- Combine ideas to create a better design
- Navigate the short maze using dead reckoning with 2 pauses to adjust the robot.
- Look at this robot, can you program your robot to make a letter "Z" and then spin in a loop to celebrate by sensing where to turn using color?
- Design clues to get to the treasure from the pirate ship using at least 3 different color commands.Write out your directions and then code the robot to follow them.
- Navigate by using senses
- Navigate by dead reckoning
- Share posters
- Plan to run a robot through a maze using dead reckoning.
- Share robot abilities
- Navigate a robot using dead reckoning
TODAY'S WORK WILL GO ON 4th QUARTER GRADES
- We will be working with robots tomorrow. Robots can be given commands to get from one place to another by telling them exactly how many steps to take and what direction to turn or by giving them directions on how to make their own decisions.
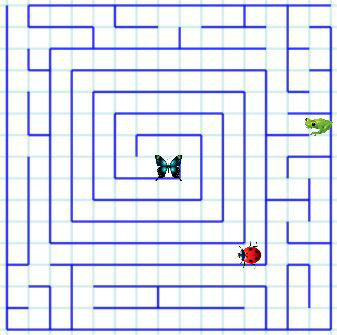
- Print out this maze and write directions to get the frog and bee out of any exit of the maze. Each square is 1 step. The robots understand the commands F for Forward, L for turn Left and R for turn right. To go forward 5 times write F5.
- The butterfly will follow this code: Repeat these steps until you get out of the maze: go forward until you reach a shape. If the shape is a square turn left, if the shape is a circle turn right. Draw the circles and squares in the blocks needed to get the butterfly out of the maze.
- Work in teams of 2-3 to create posters using the paper on the table at the front of the room that highlight the abilities of modern robots. Each person must print out a different robot and write a description. Choose a theme for your group poster: Flying robots, robots in space, household robots, humanoid robots, walking robots, military robots, rescue robots or robots that are like animals.
- Use dead reckoning and sensing to describe a robot path
- Describe modern robots
- This week we will learn about different robots. Watch the video (you don't need sound) and fill in the notes in Class Notes in OneNote.
THIS WILL GO ON 3rd QUARTER GRADES and is due TODAY.
- Describe the abilities of different modern robots
- Describe different kinds of robots and what they do.
- Interact with robots to be able to control them. Work in teams.
- Combine different codes to control a robot.
- Present strategies and reflect on the mini-project.
- Interact with robot code to be able to control an Ozobot robot.
- Present and reflect on 2 step machines.
- Use code to move and turn a robot.
- View the world's largest Rube Goldberg machine.
- Look up simple Rube Goldberg machine ideas.
- Experiment with spinners and ramps. Design and build a turn-around 2-step device to get 1 car from the desktop to the chair and a second car facing a different direction from the chair to the floor on ramps. Work in pairs.
- Identify elements of Rube Goldberg contraptions.
- Design a 2 step machine.
- What are the lessons learned from yesterday's design project?
- Combining many different technologies can make complex things possible. Review the core technologies, match them, and identify them in the video in teams. Why is measurement important in a project like this?
- Identify core technolgies in a Rube Goldberg machine.
- Measuring inches review. How many can you get right out of 10? Try one more.
- How far can you go? USE AND DOCUMENT THE DESIGN PROCESS. Using 4 sheets of newspaper and 1 foot of tape, how far can you get a car to travel? work in pairs.
- Write and measure distances in inches.
- Use the design process.
- Thinking outside the box: look at unusual vehicles
- Finish current events in technology topics.
- Do a measurement review paper.
- Finish presenting new technology.
- Practice accurate measurement.
- Review website design
- Present current events in technology topics.
- Compare features of website design tools.
- Describe new technology
- Evaluate website features.
- Presentation: eCommerce (etsy, kickstarter, and more) what are the advantages and disadvantages?
- Do some quick research on an aspect of eCommerce and share findings.
- Finish your "What's new in technology" page to share tomorrow.
- Explain advantages and disadvantages of eCommerce
- Finish summary of new technology.
- Create a "What's new in technology" page. Write a title and at least 6 sentences in your own words with a reference. Include at least 2 pictures. Here are some ideas: popsci , CES or livescience
- Summarize a current technology as a web page.
- Presentation: quality
- Finish your "About Me" page PUBLISH to update.
- Explain what makes a quality web page
- Finish personal web pages.
- Finish your bridge page. Add information about how you used the design process, describe what is on the page and can be learned, give advice to future students.Fill in the bridge page grading rubric.
- Find your website address in your SETTINGS. Add it to OneNote.
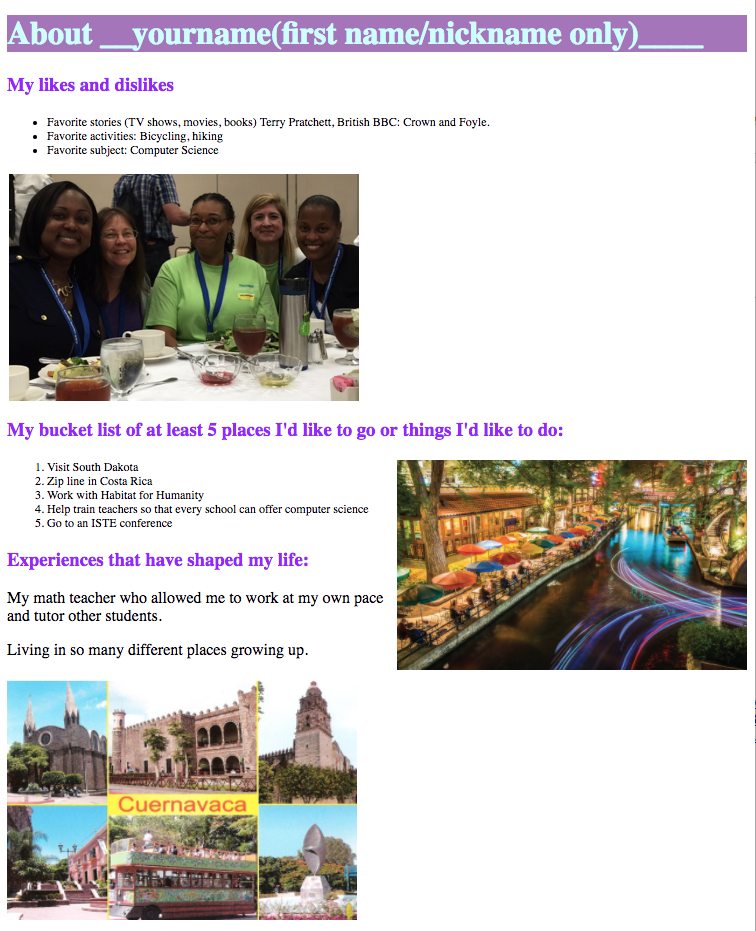
- Start an "About Me" page to your website that tells about things you like, that you'd like to do, and that have shaped your life and whatever else you'd like to include. Include pictures and other interesting elements to make a creative page. PUBLISH to update your site.
- Finish reflection on bridge project.
- Create a personal web page.
- QUIZ
- Finish your bridge page. Add information about how you used the design process, describe what is on the page and can be learned, give advice to future students.
- Fill in the bridge page grading rubric.
- PUBLISH your site again after making changes.
- Reflect on the bridge design project and communicate learning on a web page.
- News: 3D printed house in 1 day.
- Kahoot jumble. quiz tomorrow.
- Go over challenges on review page, create a bridge web page. Use at least 5 different elements and pictures are on the Handout drive.
- PUBLISH your website. Put a link to your website in the Collaboration space in OneNote on the websites page.
- Create a bridge web page using different page elements
- publish a website.
- Finish review sheets. Save until Tuesday's quiz.
- Presentation: webpage layout and styles. how to add elements in Weebly.
- Create a review page in Weebly. Follow the guidelines.
- Add a page to a website
- Review history and engineering design
Find the mean, median, and mode for these numbers.
29, 3, 93, 60, 49, 83, 35, 72, 63, 14, 29, 51, 90
- Fill in a review sheet side 1.
- Work on weebly websites
- Find pictures that represents foundations of technology, make a collage in Pixler, and put it on the page
- Finish your home page
- Put a link to your website in the Collaboration space in OneNote on the websites page.
- Review history, forces, stats, and vocabulary
- Build a website
- Bridge test wrap up. Use some statistical analysis: mean, median, mode. Analyze torque, compression and tension failures in OneNote Bridge page.
- Kahoot and review of FOT so far. [Beat your score or get points if you missed the game]
- Sign in to weebly and Create a home page for your class website.
- Analyze bridge quality of construction, strength and appearance with statistics
- Review FOT topics
- Create a website home page
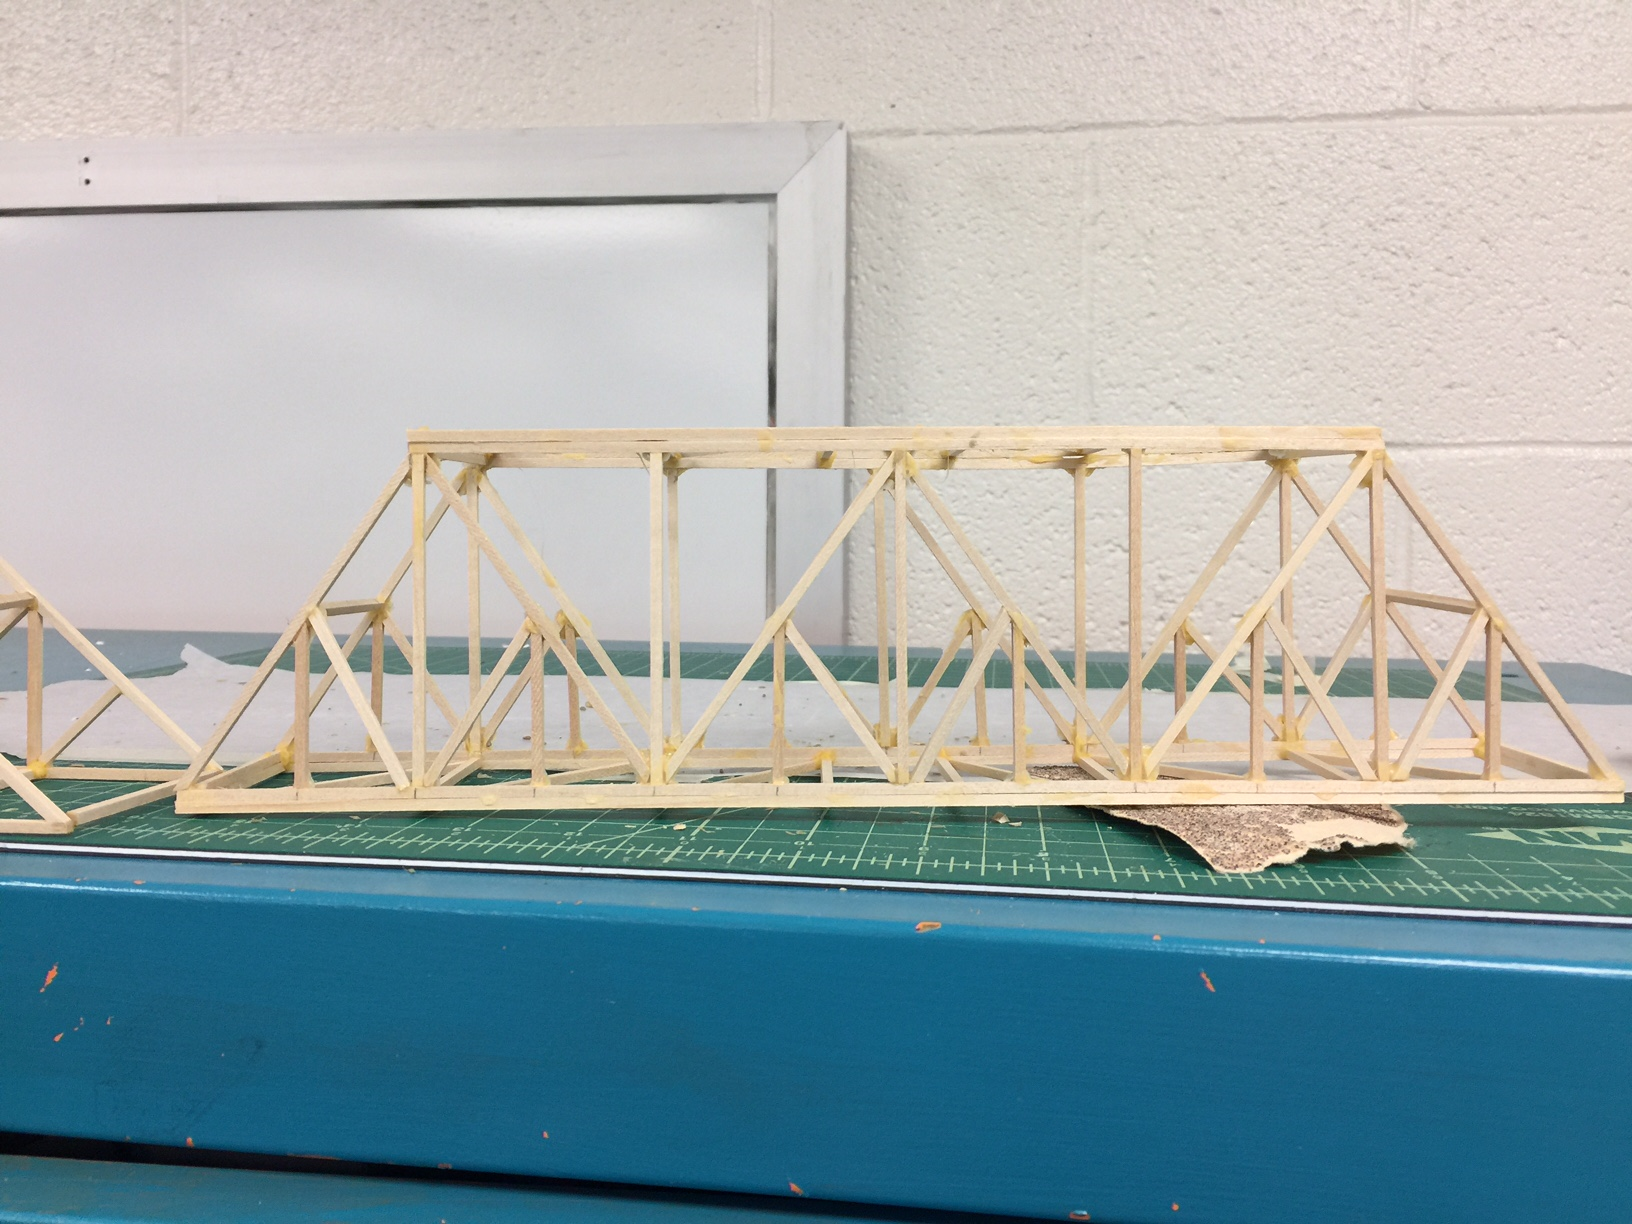
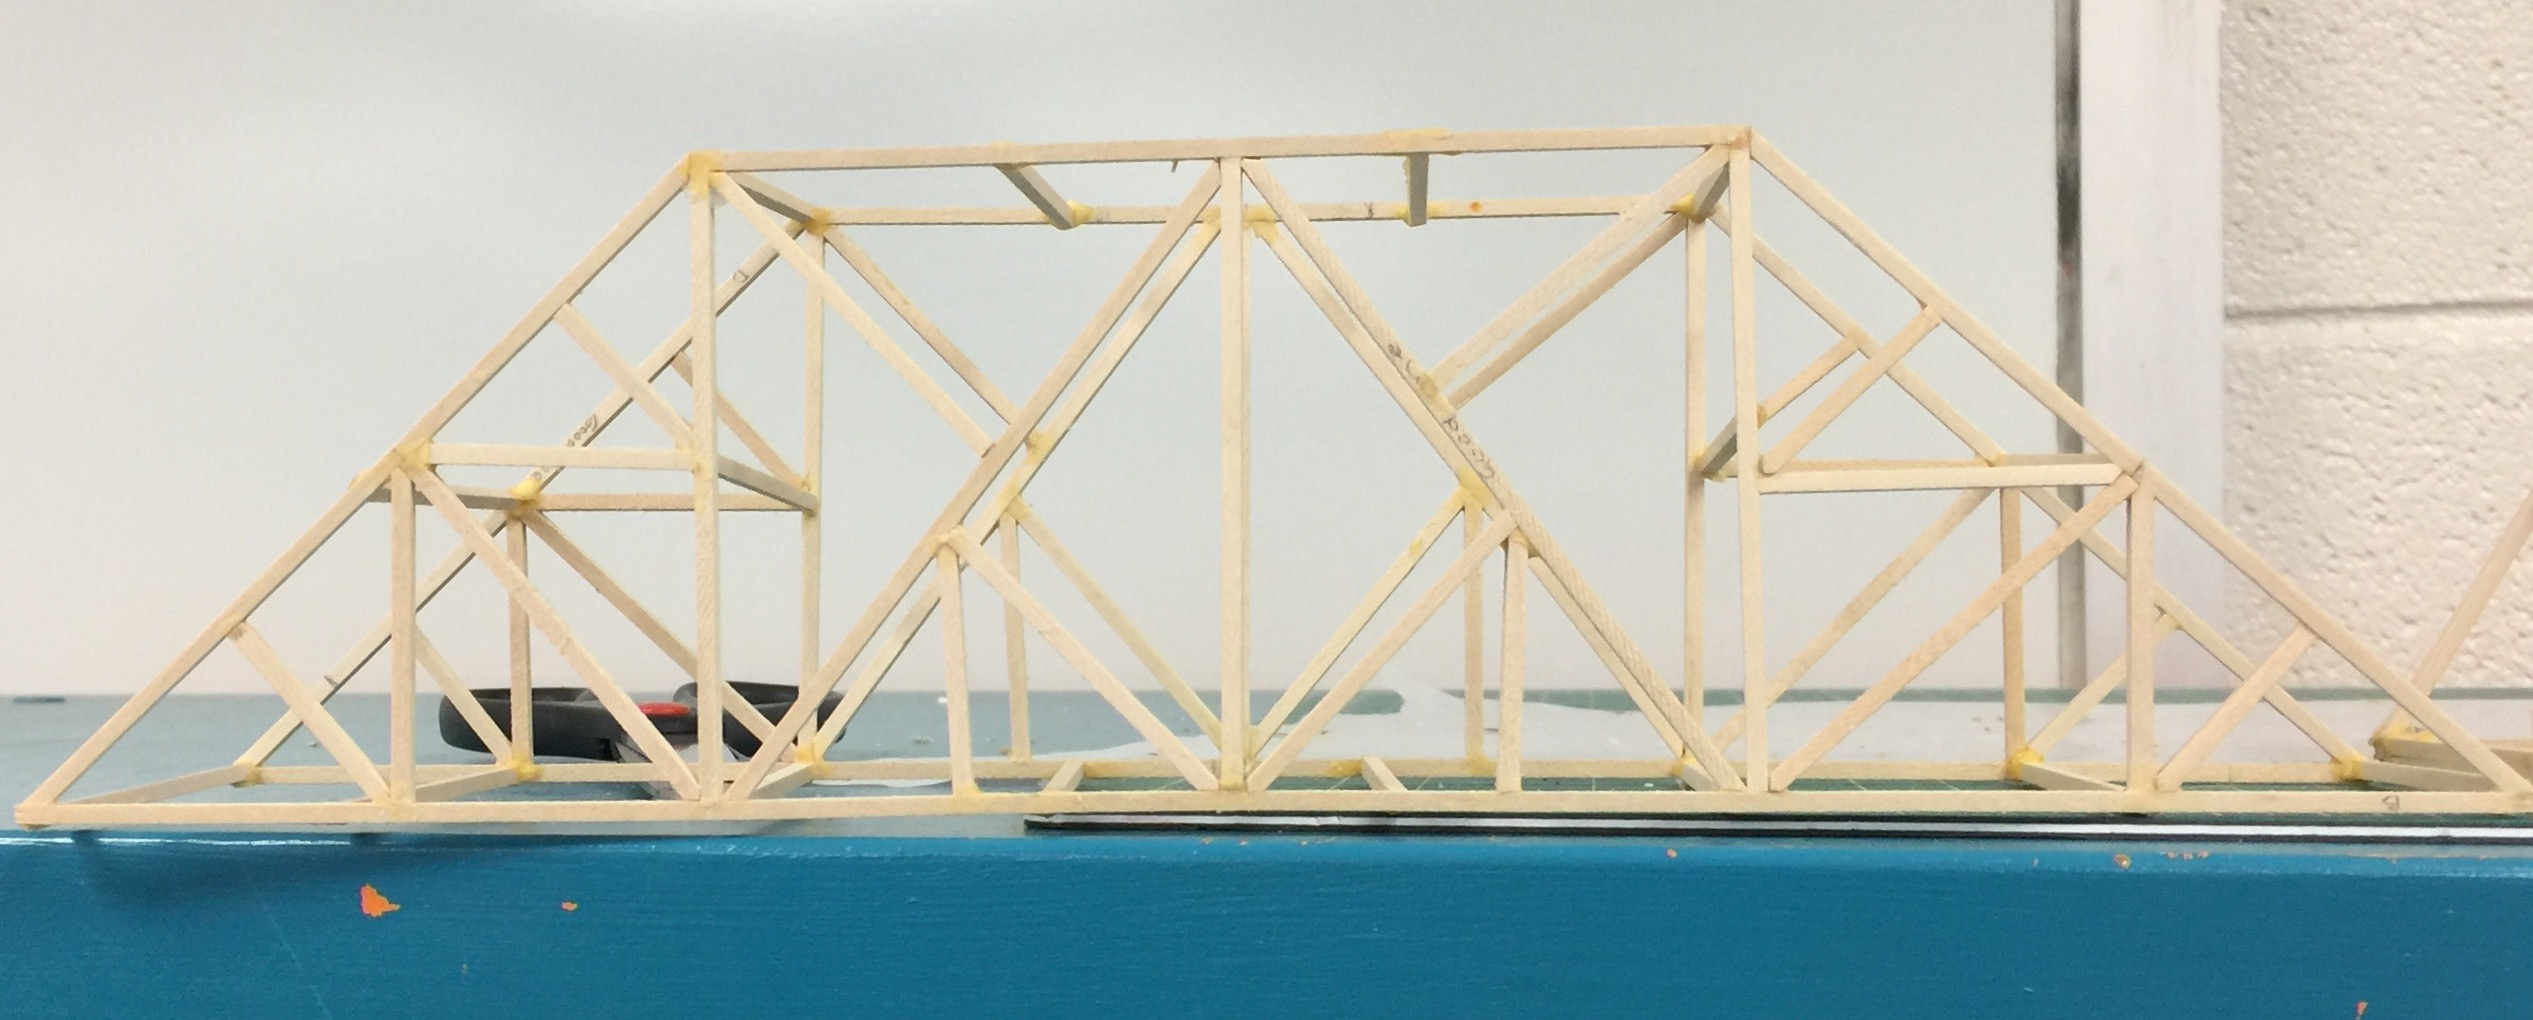
- Test bridges.
- Evaluate bridge strength
- Use safety in the lab while cutting and gluing bridges.
- Join halves together to make whole sides.
- Build bases and tops.
- Use safe practices while constructing bridges.
- Use safety in the lab while cutting and gluing bridges.
- Join halves together to make whole sides.
- Build bases and tops.
- Use safe practices while constructing bridges.
Sorry, change of plans. We will finish bridges on Friday & Monday. NO BUILDING TODAY
- Read about 10 amazing bridges in Maryland. Print out this worksheet and hand it in TODAY or beginning of class tomorrow.
- Find out about bridegs in Maryland
- Use safety in the lab while cutting and gluing bridges.
- Join halves together to make whole sides.
- Build bases and tops.
- Use safe practices while constructing bridges.
- Use safety in the lab while cutting and gluing bridges.
- Join halves together to make whole sides.
- Build bases and tops.
- Use safe practices while constructing bridges.
- Fix all quiz errors. Copy correct procedures.
- Tape paper to cardboard for bridge construction.
- Cut and label wood for bridge construction.
- Use safety in the lab while cutting and gluing bridges.
- Use safe practices while constructing bridges.
- Safety quiz.
- Sandpaper notes.
- Compare design drawings. Select the best to use for construction. Trace as needed.
- Mark wood to be cut for your half of a bridge side.
- Demonstrate understanding of safety around hot and sharp tools.
- Discuss procedures and saftey using sandpaper, cutters and hot glue guns. Hand in notes.
- Calculate total wood available, total wood needed, and choose a base based on how much wood is available. (Set some aside to reinforce weak spots)
- Calculate materials needed.
- Calculate available materials.
- Select base design.
- Measure to build.
- Look at designs for bridge bases and tops. Sketch at least 3 ideas for bases on your warmup paper.
- Each person design a different bridge base from the others in your group. Do a group write up of the advantages / disadvantages of each design with sketches of each. Bridge quiz next Thursday.
- Build and compare base designs
- Write the length of each strut on your drawing.
- Calculate total wood needed per side. Sketch a good top and bottom (half size sketch, double amounts). Calculate wood needed for the top and bottom and total wood.
- Build and test structural models.
- Calculate materials requirements.
- Presentation: bridge building and balsa wood. Successful bridges 1 and 2
- Discuss how to simplify bridge structures for the size requirements. Each team member create a different size bridge using the same design priniciples in the Bridge Design program.
- In pairs: Draw a full scale drawing of your bridge to build. (draw half on one paper)
- Modify designs for different scales.
- Sketch full scale templates.
- Work on paper bridge models.
- Hand in your description of why your group selected your design with suggestions for how it could be made stronger, and more attractive.
- Build a mock up design model.
- Reflect on design improvements.
- Construct paper bridge models for a single side of a bridge. Use the paper struts and as little masking tape as possible.
- First, discuss your design as a group and sketch a plan. The bridge must use at least 40 struts in addition to the baseline. It must be symmetric. It should have a creative design. You can manufacture additional struts of different sizes as needed. Include a description of why you selected the design that you did.
- Justify the selection of a design.
- Build a mock up design model.
- Create a 20' bridge in the WestPoint Bridge designer like one that is on the front board. You can add parts as needed to make it work.
- Print screen, paste into Word, write a summary of what parts are needed for your bridge. Which parts are there many of? Put your work onto the Collaborative Bridge page in OneNote.
- Design a bridge according to a specific creative design model.
- Approximate and describe the parts needed.
- Evaluate bridge designs. Vote on the best designs that balance strength (with thin beams), aesthetics and practicality.
- Create at least 10 paper support beams.
- Compare existing designs to select the best ones to build.
- Use a manufacturing process to create parts for assembly.

- Print a copy of the bridge design you would most like to build. Divide it into quarters.
- Start to build a folded paper frame bridge to demonstrate your design before you start working with wood..
- Select a design and build the parts needed to create a model.
- Evaluate bridge designs. Hand in your evaluation.
- Read the design brief.
- Define the problem and brainstorm ideas. Create and save 2 working ideas.
- Evaluate designs by criteria.
- Analyze a design brief.
- use the design process to create a design
- Course selection: what's available in technology.
- Is hollow stronger than solid? Research and explain your answer.
- Work in teams of 2-3. What is the longest bridge that can be made of only 100X100 parts. Print your bridge.
- Describe properties of different materials used in bridge construction
- Design a bridge with only thin parts.
- Look at unusual bridges.
- Design a 24 ft bridge at minimal cost.
- Describe innovative approaches to bridge design
- Design a long bridge and optimize for cost.
- Forces that act on bridges and different kinds of trusses.
- How to design a good bridge.
- Design a bridge according to specific guidelines. Optimize to reduce cost.
- Create bridges according to specific design constraints.
- Study bridge disasters.
- Design bridges
- Describe reasons why bridges fail
- Design truss bridges in a realistic simulation
- There should be a program on your computer called West Point Bridge Designer. Use it to design a working bridge. Save your bridge.
- If the program doesn't work ask the sub to call Mr. Douglass who fixes the computers at La Plata. If it still doesn't work do the Cargo Bridge game, and the Bridge Builder game, it's not as real but it's fun. Copy and paste screenshots of your best creations in your section of the class OneNote notebook in the Projects section on the Bridges page.
- Design truss bridges
- Do the bridge webquest. Answer questions on blank paper and hand them in by the start of class on Tuesday.
- Finish bridge construction from last week if needed. Check the rubric. Put bridges on the table by the door to the social studies hallway. DUE TODAY
- Sketch and describe features of common bridge types.
- Investigate challenges in bridge design
- Finish model bridge construction. Check the rubric
- Design a model bridge with details and features.